Overview
You may receive complains from a user about the inability to unsubscribe from Playbooks and want to add an unsubscribe link to emails in Playbooks so that prospects could unsubscribe from Plays.
Information
Currently, there is no feature in Playbooks to include an unsubscribe link to emails sent to prospects.
However, you can implement a custom solution in your CRM to mark records as Do Not Email using an unsubscribe link; also, you will need to add this link to your email templates in Playbooks. As Playbooks pulls data about records marked as Do Not Email from your CRM, such users will not receive emails from Playbooks anymore. you can implement a solution to mark records as Do Not Email in Salesforce using an unsubscribe link, and you will be able to add this link to your email templates in Playbooks.
To generate an unsubscribe link for emails that are sent from Playbooks, you can use the following solution:
- Add the Do Not Email field to your layout in Salesforce for record types that you use, make sure that this field is visible and can be edited by users.
Note: Steps 1 and 2 should be done by a Salesforce Administrator. - Install the Unsubscribe opt-out Salesforce app for your CRM instance (instructions added below).
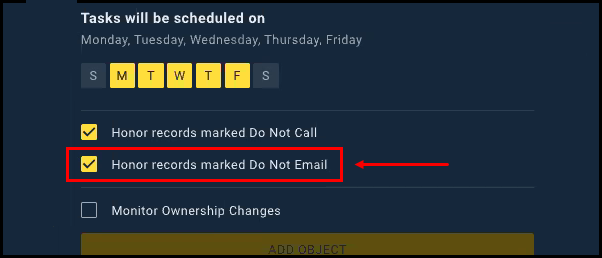
- Make sure that the Honor records marked as do not email option is enabled for each team in Playbooks - from the Manager App, open the Teams tab and click on the ellipsis button next to a team and select Edit.
-
Update all of the email templates in Playbooks by adding an unsubscribe link generated from the Unsubscribe opt-out Salesforce app.
You can use the{{email}}merge field to have the prospect's email populated within the unsubscribe link in Playbooks.
Additionally, you can prevent agents from creating their own templates by removing the 'Create Email Templates' and 'Edit All Templates' rights for non-admin permission groups in Playbooks.
Once a customer marks unsubscribes, this data will be recorded in Salesforce and then synced to Playbooks within 12 hours.
Note: This is only one of possible solutions. Another option would be to develop a very simple webpage that integrates with your CRM used to mark users as Do Not Email in your CRM based on their email; You can then use the{{email}}merge field when adding the unsubscription link to emails/ templates in Playbooks.
Here are the steps to set up the Unsubscribe opt-out application for Salesforce copied from the AppExchange:
1. Install the package from the AppExchange.
2. Open Setup.
3. Enter "email services" into the quick search bar.
4. Click on Email Services under Custom Code.
5. Click the New Email Service button.
6. Name the Email Service.
7. Using the Apex Class look up button (spyglass) search for and select "unsubscribe".
8. Confirm the Active checkbox is selected (Active = true).
9. Set Over Email Rate Limit Action to "Requeue message."
10. Click the Save and New Email Address button.
11. Set Email Address Name to "Unsubscribe".
12. Set Email Address to "unsubscribe".
13. Confirm the Active checkbox is selected (Active = true).
14. Set the Context User (the one who will update the Do Not Email field).
15. Click Save.
16. Open Setup.
17. Enter "apex class" into the quick search bar.
18. Click on Apex Class under Custom Code.
19. Edit the "unsubscribe" apex class.
20. Click Save without making any adjustments to the apex class (if you find things aren't working later, try repeating this step).
Now you can take the email address you created inside of your email service and put it in email templates or signatures as a mailto link. The mailto link can be set up to populate a default subject and body. The subject will need to include the word "unsubscribe". Use the formatting of the example link and feel free to adjust the wording. ?subject= indicates the start of the subject line while &body= indicates the start of the body of the email. You can add spaces by entering %20 in between words.
Example mailto link.
mailto:xxxxxxxxxx?subject=Unsubscribe%20From%20Emails&body=I%20confirm%20I%20want%20to%20opt%20out%20from%20any%20emails.
Replace xxxxxxxxxx with the email address from steps 11 to 15
Priyanka Bhotika
Comments